Android: Menus and Dialogs
Table of contents:
1. Menus
- Options menu
- Context menu
- Sub menu
- Creating different Menus
- Alert Dialog
- Progressbar dialog
- DatePicker dialog
- TimePicker Dialog
- Toast
- Creating different dialogs
- Menus provide familiar interfaces to expose application functions without sacrificing screen space.
- Android offers an easy programming interface to provide standardized application menus.
- Android offers three fundamental types of application menus:
- Options Menu
- Context Menu
- Sub-menu
Options Menu:
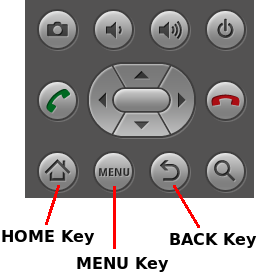
By default, every Activity supports an Options menu of actions or options. It is revealed by pressing the device MENU key.
- Options Menu has two groups of menu items:
- Icon Menu
- Collection of maximum of six menu items
- Supports Icons and short-cuts
- Expanded Menu
- Exposed by the 'More' menu item
- Displayed when the icon menu becomes over-loaded
- Comprised of sixth options menu item and the rest.


Create Options Menu:
- Following methods are provided by Activity class to create an Options menu :
2 public boolean onPrepareOptionsMenu(Menu menu)
3 public boolean onOptionsItemSelected(MenuItem item)
4 Override onCreateOptionsMenu() callback method, to add items to Options menu using menu.add() method.
- menu.add() adds a MenuItem and returns the newly created object to set additional properties like icon, shortcut, ...etc.
- public abstract MenuItem add(groupId, itemId, order, CharSequence)
- Override onOptionsItemSelected() callback method to perform any action for a selected Options menu item by identifying its id using item.getItemId().
- public abstract int getItemId()
- Override onPrepareOptionsMenu() callback method to update the menu dynamically each time it gets displayed.
Options Menu Life Cycle:

Options Menu Example:
/* Creates the menu items */
public boolean onCreateOptionsMenu(Menu menu) {
menu.add(0, 1, 0, "Menu 1");
menu.add(0, 2, 0, "Menu 2");
return true;
}
/* Handles item selections */
public boolean onOptionsItemSelected(MenuItem item) {
switch (item.getItemId()) {
case 1: //Action for Menu 1
return true;
case 2: //Action for Menu 2
return true;
}
return false;
}
/* Re-write the Options Menu as it is opened */
public boolean onPrepareOptionsMenu(Menu menu) {
//Action to modify Menu each time it is opened.
SubMenu sm1 = (SubMenu)menu.getItem(0);
sm1.setIcon(R.drawable.icon);
sm1.add("NM X");
menu.getItem(4).setIcon(R.drawable.icon);
return super.onPrepareOptionsMenu(menu);
}
Sub Menu:
Sub menu is a floating menu, it can be a child menu of options menu or context
menu.
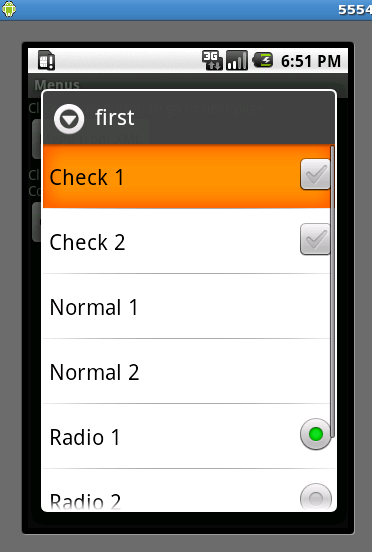
It supports checkboxes, radio buttons and shortcut keys.
It does not support item icons, or nested sub menus.

Context Menu
- Context menu is a floating menu that is associated with a control.
- Context menu is launched when the control has the focus and the D pad is pressed.
- Context menus can be assigned to any View within an Activity.
- It provides functions relating to the view, to which it is registered.
- It supports submenus, checkboxes, radio buttons.
- It does not support shortcuts and icons.


Create Context Menu:
Methods provided by Activity class to create and register an Context menu are :
- public void onCreateContextMenu(ContextMenu, View, ContextMenuInfo)
- public boolean onContextItemSelected(MenuItem item)
- public void registerForContextMenu(view)
- Override onCreateContextMenu() callback method, to add items to Context menu using menu.add() method.
- menu.add() adds a MenuItem and returns the newly created object to set properties like checkboxes, radio buttons ...etc.
- Override onContextItemSelected() callback method to perform any action for a selected item by its id using item.getItemId().
- Call registerForContextMenu(view) method inside onCreate() method to register the context menu for a view.
Context Menu Life Cycle:

Context Menu Example:
/* Register a view to */
public void onCreate(Bundle savedInstanceState){
super.onCreate(savedInstanceState);
Button update = new Button(this);
update.setText(“UPDATE”);
setContentView(update);
registerForContextMenu(update);
}
/* Create a Context Menu */
public void onCreateContextMenu(ContextMenu menu, View v, ContextMenuInfo
menuInfo) {
super.onCreateContextMenu(menu, v, menuInfo);
menu.add(0, 1, 0, "Edit");
menu.add(0, 2, 0, "Delete");
}
/* Action on item selection */
public boolean onContextItemSelected(MenuItem item) {
switch (item.getItemId()) {
case 1: //Action for menu item “Edit”
return true;
case 2: //Action for Menu item “Delete”
return true;
default: return super.onContextItemSelected(item);
}
}
Context sub Menu:
- Menu class provides a method named addSubMenu() to add sub menus under an Options menu or a Context menu.
- public abstract SubMenu addSubMenu(group, item, order, String)
- Submenu.add() method is used to add sub-menu items.
- onOptionsItemSelected() callback method for a SubMenu item refers to it's parent's callback method.
- Inside onOptionsItemSelected() callback the state of the radio button/ checkbox must be set, if the submenu item is a radio button or checkbox.
Dialog:
- A dialog is a small window that appears in front of an Activity.
- The underlying Activity loses focus and the dialog accepts all user interaction.
- Normally used for notifications and short activities that directly relate to the application in progress.
- Android supports following types of dialogs.
2 Progress Dialog
3 Date Picker Dialog
4 Time Picker Dialog
5 Toast
Alert Dialog:
- A dialog that can manage zero, one, two or three buttons.
- It can also manage a list of selectable items that can include checkboxes or radio buttons.
- The AlertDialog is capable of constructing most dialog user interfaces and is the suggested dialog type.
- AlertDialog class is a subclass of Dialog class and has a nested subclass
- AlertDialog.Builder to construct a dialog.
Other Dialogs:
- Progress Dialog
- A dialog that displays a progress wheel or progress bar.
- It supports buttons like in AlertDialog.
- DatePicker Dialog
- A dialog that allows the user to select a date.
- TimePicker Dialog
- A dialog that allows the user to select a time.
Toast:
- A toast is a transient Dialog box containing a quick little message for the user.
- Toasts never receive focus and they don’t interrupt the active application.
- They provide an ideal mechanism for alerting users to events occurring in background Services without interrupting foreground applications.
- Toast class provides a static method to create a standard toast display window.
- static Toast makeText(context, text, duration)
- Examples : Volume control, message for change settings.
Create Dialog:
- A dialog is always created and displayed as a part of an Activity.
- Activity provides following methods to create and display dialogs,
- onCreateDialog(int id)
- onPrepareDialog(int id, Dialog dialog)
- showDialog(int id)
- Override the onCreateDialog(int id) callback method to create a dialog.
- Override the onPrepareDialog(id, dialog) callback method to populate the dialog over the screen each time it gets displayed.
- Call the showDialog(int id) method to display a dialog.
Dialog Life Cycle:

Create Dialog:
Override onCreateDialog(id) to create a dialog
protected Dialog onCreateDialog(int id) {
switch(id){
case DIALOG_ALERT_ID:
//Create required dialog and return object
case DIALOG_DISP:
//Create required dialog and return object
case DIALOG_PROGRESS:
//Create required dialog and return object
default:
return super.onCreateDialog(id);
}
Call showDialog(id) to display the corresponding dialog
showDialog(DIALOG_PROGRESS);
Override onPrepareDialog() to modify a dialog
protected void onPrepareDialog(int id, Dialog dialog) {
super.onPrepareDialog(id, dialog);
switch(id) {
case DIALOG_ALERT_ID:
//Modify in dialog and break;
case DIALOG_DISP:
//Modify in dialog and break;
case DIALOG_PROGRESS:
//Modify in dialog and break;
default :
break;
}
}
Create Alert Dialog:
Create a dialog builder using AlertDialog.Builder by passing context.
AlertDialog.Builder builder = new AlertDialog.Builder(this);
Set all required properties for the created builder.
builder.setMessage(“message to display”)
.setTitle(“title to display”)
.setCancelable(false);
//Can set different buttons here
setPositiveButton("Yes", new DialogInterface.OnClickListener() {
//override onClick() and perform required operation like finish()
}
setNegativeButton("No", new DialogInterface.OnClickListener() {
//override onClick() and perform required operation like cancel()
})
Retrieve the Alert dialog object with builder.create().
AlertDialog alertObj = builder.create();
Create Progress Dialog:
Create a progress dialog object
ProgressDialog progress = new ProgressDialog(mContext);
Set all the required properties and return
progress.setProgressStyle(ProgressDialog.STYLE_HORIZONTAL);
progress.setTitle("Loading...");
progress.setMessage("Loading. Please wait...");
progress.setCancelable(false);
Create the object by its show() method, as shown below.
ProgressDialog dialog = ProgressDialog.show(this, "Loading...",
"Loading. Please wait...", true);
//Can set other properties here also
dialog.setCancelable(true);
dialog.setIcon(R.drawable.icon);
Create Time Picker Dialog:
Create a TimePickerDialog object by passing context and other parameters, as
shown below.
//Get the current Time
final Calendar c = Calendar.getInstance();
mHour = c.get(Calendar.HOUR_OF_DAY);
mMinute = c.get(Calendar.MINUTE);
//Create and return the TimePickerDialog object
return new TimePickerDialog(this, new OnTimeSetListener() {
public void onTimeSet(TimePicker view, int hourOfDay, int minute) {
//Perform operation on time set
}}, mHour, mMinute, true);
Create Date picker dialog:
Create a DatePickerDialog object by passing context and other parameters, as shown below.
//Get the current Date
final Calendar c = Calendar.getInstance();
mYear = c.get(Calendar.YEAR);
mMonth = c.get(Calendar.MONTH);
mDay = c.get(Calendar.DAY_OF_MONTH);
//Create and return the DatePickerDialog object
return new DatePickerDialog(this, new DatePickerDialog.OnDateSetListener() {
public void onDateSet(DatePicker view, int year,
int monthOfYear, int dayOfMonth) {
//Perform operation on date set
}
}, mYear, mMonth, mDay);
Create Toast:
Create a Toast object with application context.
Toast t = new Toast(getApplicationContext());
Set properties like text, duration and position.
t.setDuration(Toast.LENGTH_LONG);
t.setText("Dialog Displayed from Toast");
t.setGravity(Gravity.LEFT, 10, 100); //Position, xOffset and yOffset
Display a Toast using its show() method.
t.show();
Create directly using its static method makeText() as below.
Toast t = Toast.makeText(getApplicationContext(), "Dialog Displayed",
Toast.LENGTH_SHOT);
Comments
Post a Comment
Please post comments here:-)